从零安装Mistral开发环境最佳实践
本博客所有文章采用的授权方式为 自由转载-非商用-非衍生-保持署名 ,转载请务必注明出处,谢谢。
声明:
本博客欢迎转发,但请保留原作者信息!
新浪微博:@Lingxian_kong
博客地址:孔令贤的博客
微信公众号:飞翔的尘埃
知识星球:飞翔的尘埃
内容系本人学习、研究和总结,如有雷同,实属荣幸!
更新日期:2016.10.31
本文的目的是你已经有了一套devstack环境,想进行mistral的开发,安装过程需要访问网络。
同时,假设你使用pycharm作为windows IDE(Linux下的vim我实在是不适应),mistral的调试环境是在远程服务器上的一个vagrant虚拟机里,devstack环境可以是单独部署,保证能被远程服务器访问到即可。
本文中keystone地址:10.250.10.5
远程物理服务器地址:10.250.10.248
vagrant虚拟机IP地址:192.168.33.14
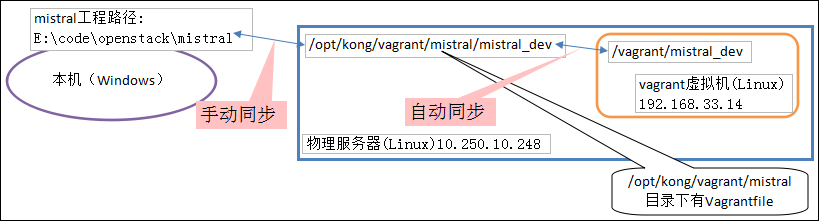
整体方案一览:
创建vagrant虚拟机
关于vagrant的使用可以参见官方文档或我之前的博客。
涉及几个注意事项:
- 基础镜像可以是ubuntu 1204或以上,但要注意1404或以上的镜像,共享目录的挂载可能会有问题(而共享目录是我们开发调试的关键),在我的那个博客中找答案。
- 我们需要在本地ssh到远程的vagrant虚拟机,需要在Vagrantfile中特殊配置。
- 可以使用密钥的方式,以root身份登录远程的vagrant虚拟机。
vagrant虚拟机创建成功后,可以修改apt源,pip源等配置,使之更适应中国的网络环境。apt-get update后,安装必要软件git, vim, curl等。
安装pip,apt-get安装的pip版本太老了,推荐如下方式:
curl -O https://bootstrap.pypa.io/get-pip.py
python get-pip.py
安装完成后,可能会出现pip路径不对,建个软连接或者指定alias搞定。
注意,本文所有的密码均为password
安装rabbitmq和mysql
apt-get -y install rabbitmq-server
rabbitmqctl change_password guest password

cat <<MYSQL_PRESEED | debconf-set-selections
mysql-server-5.5 mysql-server/root_password password password
mysql-server-5.5 mysql-server/root_password_again password password
mysql-server-5.5 mysql-server/start_on_boot boolean true
MYSQL_PRESEED

apt-get -y install mysql-server python-mysqldb
sed -i 's/127.0.0.1/0.0.0.0/g' /etc/mysql/my.cnf
sed -i '44 i skip-name-resolve' /etc/mysql/my.cnf
service mysql restart
初始化mistral数据库:
mysql -uroot -ppassword
CREATE DATABASE mistral;
USE mistral
GRANT ALL ON mistral.* TO 'root'@'%';
其实你也可以使用SQLite
安装mistral(部分)依赖库
apt-get install -y python-dev python-setuptools libffi-dev libxslt1-dev libxml2-dev libyaml-dev libssl-dev httpie
安装mistral
1、假设你的pycharm中已经有mistral工程,请先把mistral工程文件夹中的内容拷贝到远程服务器<mistral_vagrant_path>/mistral_dev路径下,并在pycharm中作如下配置。
mistral_vagrant_path是vagrant虚拟机的主目录(也就是Vagrantfile所在的目录)
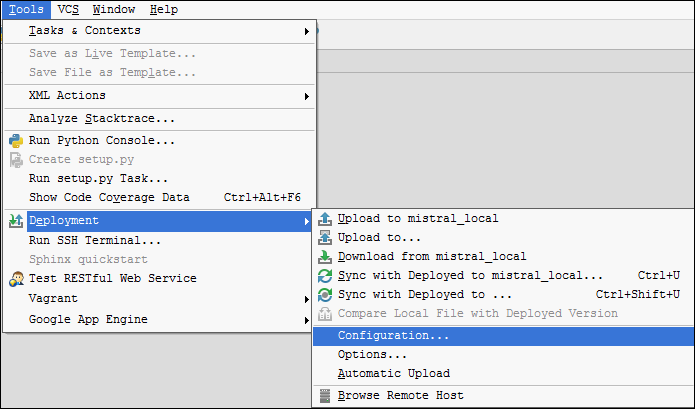
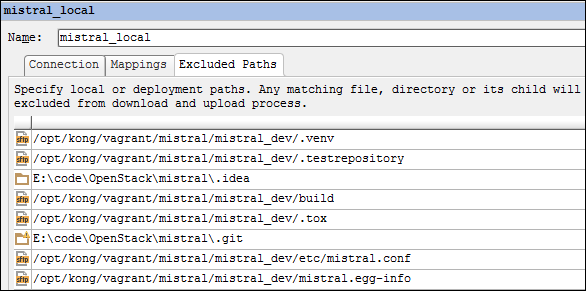
2、配置pycharm。
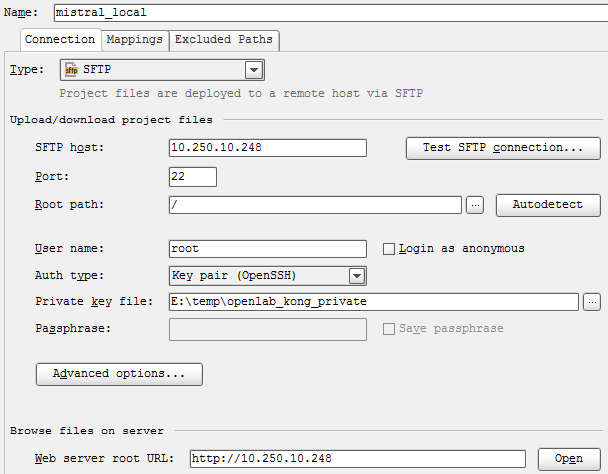
如上图,10.250.10.248是远程物理服务器的IP地址,这个选项卡主要配置连接信息,这里我是用密钥连接服务器。
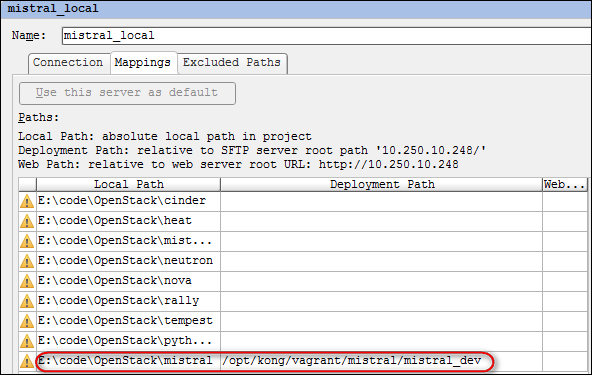
配置目录映射,将pycharm上的mistral工程所在的路径与第1步的远程路径对应。这里/opt/kong/vagrant/mistral是vagrant虚拟机的主目录(也就是Vagrantfile所在的目录)。
配置需要忽略的文件或目录,代码同步时会自动忽略它们。
安装mistral依赖库:
pip install -r requirements.txt
创建配置文件:
mkdir -p /var/log/mistral/
cd /vagrant/mistral_dev

cat <<EOF > etc/mistral.conf
[DEFAULT]
rabbit_host=localhost
rabbit_password=password
debug=true
verbose=true
log_file=/var/log/mistral/mistral.log
[database]
connection=mysql://root:password@localhost:3306/mistral
[keystone_authtoken]
auth_plugin = password
auth_url = https://api.cloud.catalyst.net.nz:35357/v3
auth_uri = https://api.cloud.catalyst.net.nz:35357/v3
username = <your username>
user_domain_id = default
password = <your password>
project_name = <your project name>
project_domain_id = default
[pecan]
auth_enable = true
EOF
安装mistral,develop模式的作用是,当mistral_dev中有代码变更时,不用重新部署就能使最新代码实时生效:
python setup.py develop
初始化mistral数据库数据:
mistral-db-manage --config-file etc/mistral.conf upgrade head
python tools/sync_db.py --config-file etc/mistral.conf
注意,如果使用SQLite,请忽略mistral-db-manage命令
启动mistral进程(all in one模式):
# python mistral/cmd/launch.py --server api,engine,executor --config-file etc/mistral.conf
|\\    //| //   // |||||| |||\\       /\      ||
||\\  //||    //     ||   ||  ||     //\\     ||
|| \\// || || ||     ||   || //     //  \\    ||
||  \/  || ||  \\    ||   || \\    //-||-\\   ||
||      || ||   ||   ||   ||  ||  //      \\  ||
||      || || _//    ||   ||  || //        \\ |||||

Mistral Workflow Service, version 2015.2.0

Launching server components [engine,api,executor]...
Server started.
安装完mistral后,建议也装一下python-mistralclient(见下个章节),方便使用。但要想直接调用API,则需要使用curl或httpie(可能你已经注意到前面我已经默认安装了httpie)
安装mistral cli
安装cli很简单:
git clone git://github.com/openstack/python-mistralclient.git
cd python-mistralclient
pip install -r requirements.txt
python setup.py develop
cp tools/mistral.bash_completion /etc/bash_completion.d/
. /etc/bash_completion.d/mistral.bash_completion
如何开发
做完了前面繁琐的步骤后,后面的开发过程就很easy了。
假设你在pycharm中修改了mistral的代码,需要在实际环境中测试,那么就先手动更新代码到环境中:
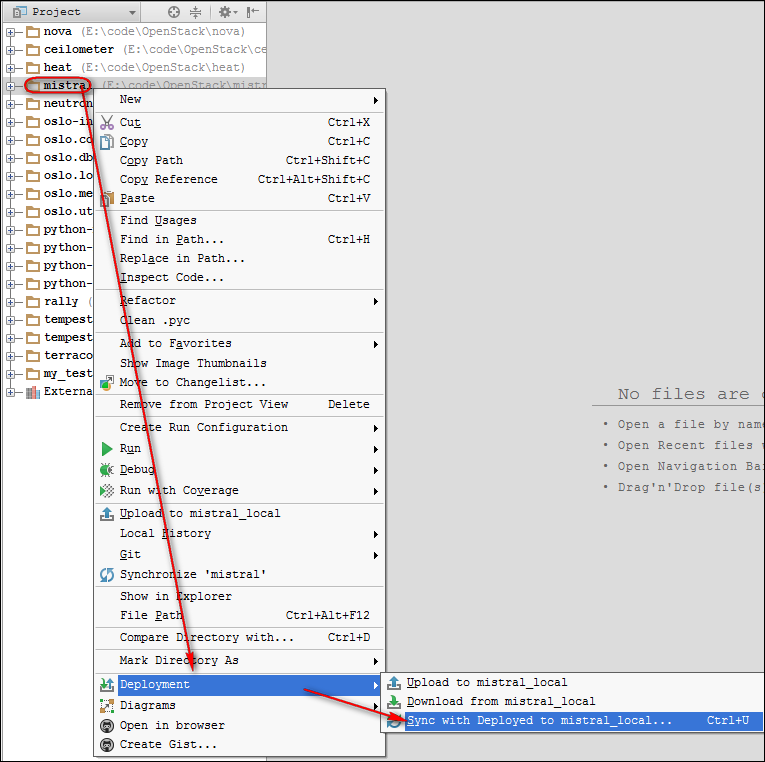
然后,停止mistral进程,再启动进程即可。